Lesson 1 - Intro to Unreal Engine 4
Intro to UE4
Download the Starter Project
Layout uses one Master Starter Project. If you’ve downloaded it recently, chances are you don’t need to re-download it.
This tutorial requires that you’ve downloaded the starter project as of 4/5/16:
- Click here to download the Layout Master starter project.
- Extract the zip folder.
- Open up the Layout_ToyBoxx.uproject and begin your adventure!
Woah! How does it feel to be inside a AAA game engine? Do you feel cool yet? Because you are. You’ve just begun your journey to becoming a Virtual Reality content creator.
After completing this tutorial, you will be familiar with some of the foundational components of Unreal Engine 4. You’ll also have the opportunity to experience your project in virtual reality. There’s a lot of new stuff in front of you, let’s jump right in!

Hover over an image to zoom in
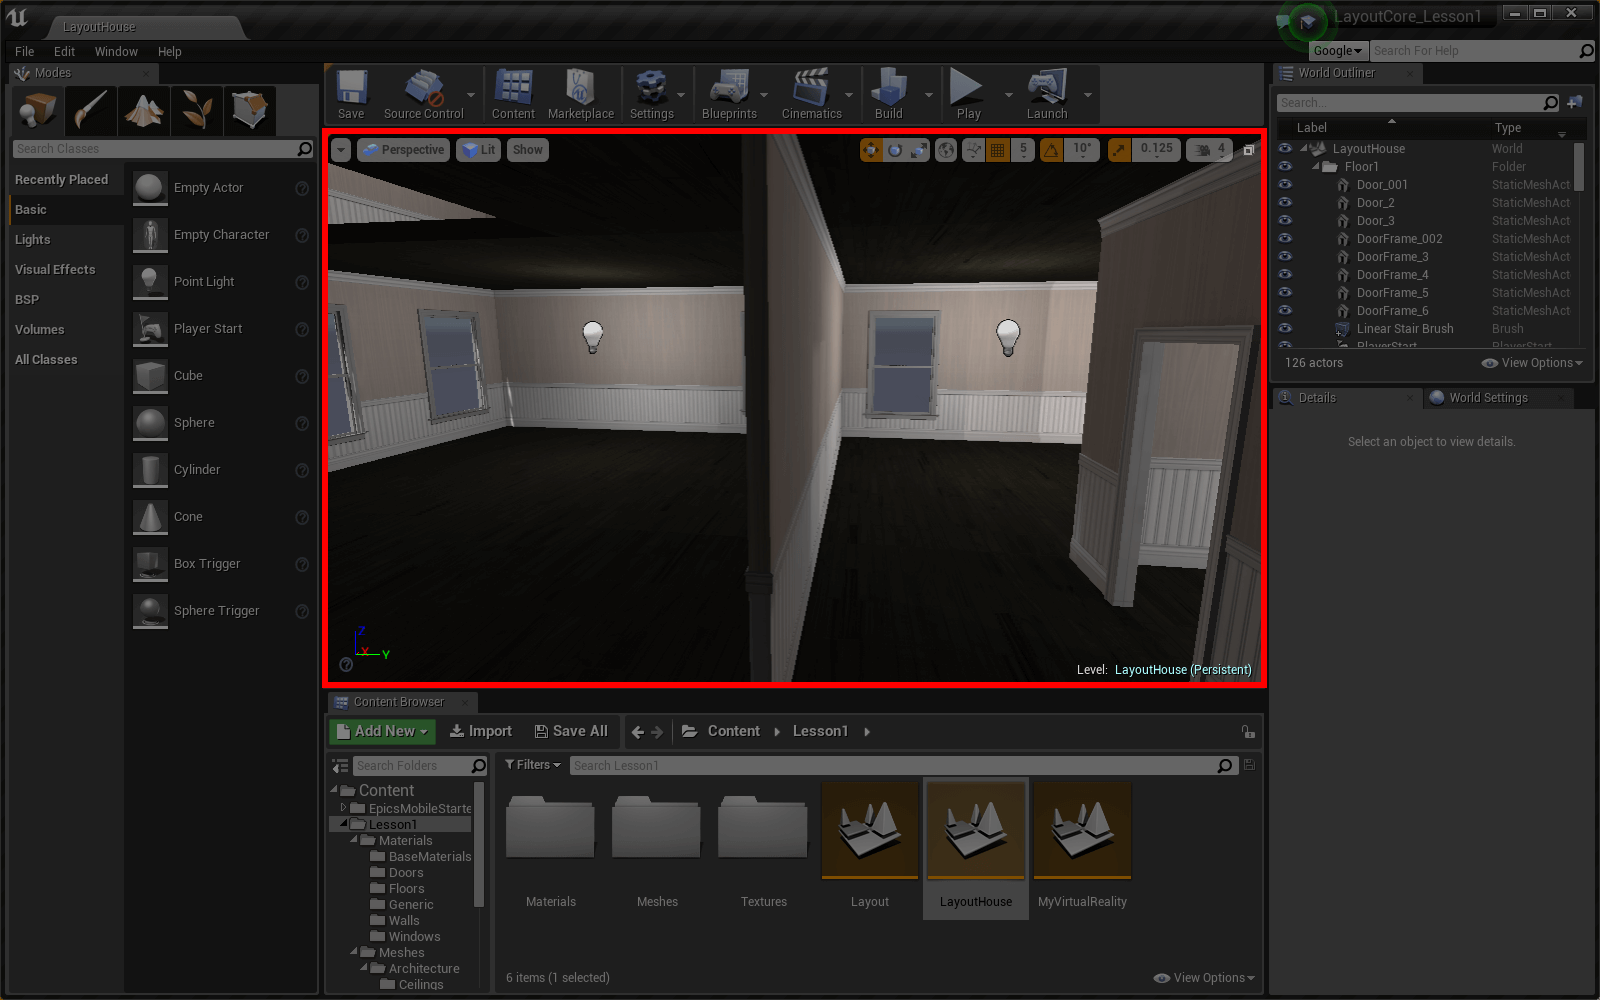
This is the Level Editor. Here you’ll be able to create your worlds, browse your assets, and edit the actors in your level.
Actors are objects that can be placed in the world. They can be physical objects like a wall, moving objects like an AI controlled entity, or invisible objects like a player spawn point.
Navigating Your World
The large panel in the center of the editor window is the Viewport.
Hover over an image to zoom in
The Viewport is the window into your world. Here you can place and manipulate actors in your level.
Navigating the world through the viewport takes practice!
- To rotate: hold the right-mouse button and drag
- To move: press W, A, S, and D while holding any mouse button
We find it’s easiest to navigate the world by pressing the right-mouse button to look and using WASD to move.
Additional Controls:
- To move: hold the left-mouse button and drag
- To move up and down: press E and Q while holding any mouse button
- To move forward and backward: scroll the middle-mouse button
- To move up, down, left, and right: hold the middle-mouse button and drag
- To get unexpected behavior: bash on the keyboard.
Camera Speed
Navigating with precision can be hard with the camera moves so quickly. The Camera Speed button in the upper right allows you to change your movement speed in the Viewport.
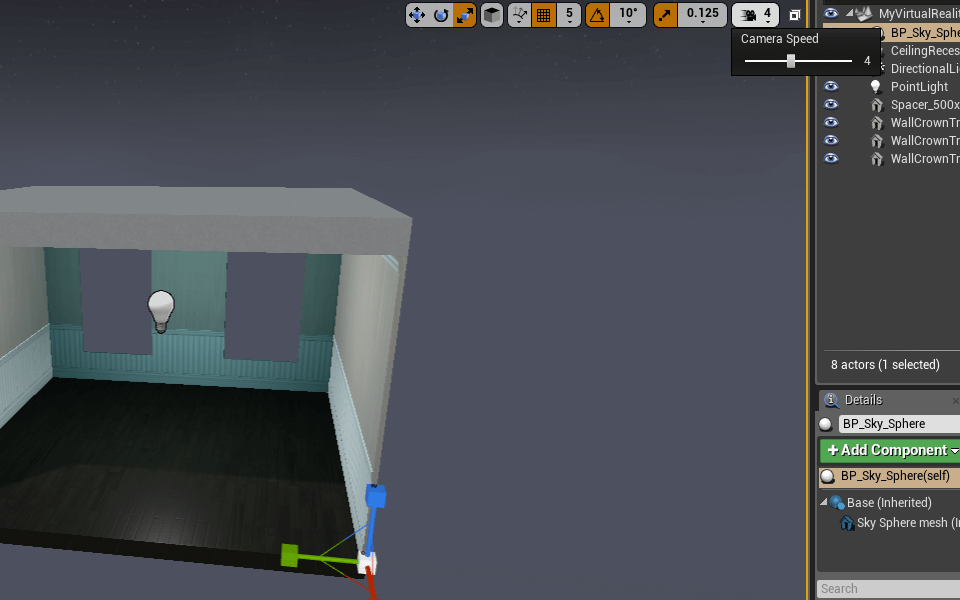
You can also change your Camera Speed by holding a mouse button and scrolling your middle mouse wheel. Note that changing the speed this way will not adjust the number shown on the Camera Speed button.
Challenge:
Navigate the house you’re inside of to find the 3 golden pyramids. Don’t press the Play button, this is your time to practice the in-editor controls! Try to not go through any walls or closed doors.
Viewing In VR
Above the Viewport is the Toolbar, which contains buttons for common commands in the editor.
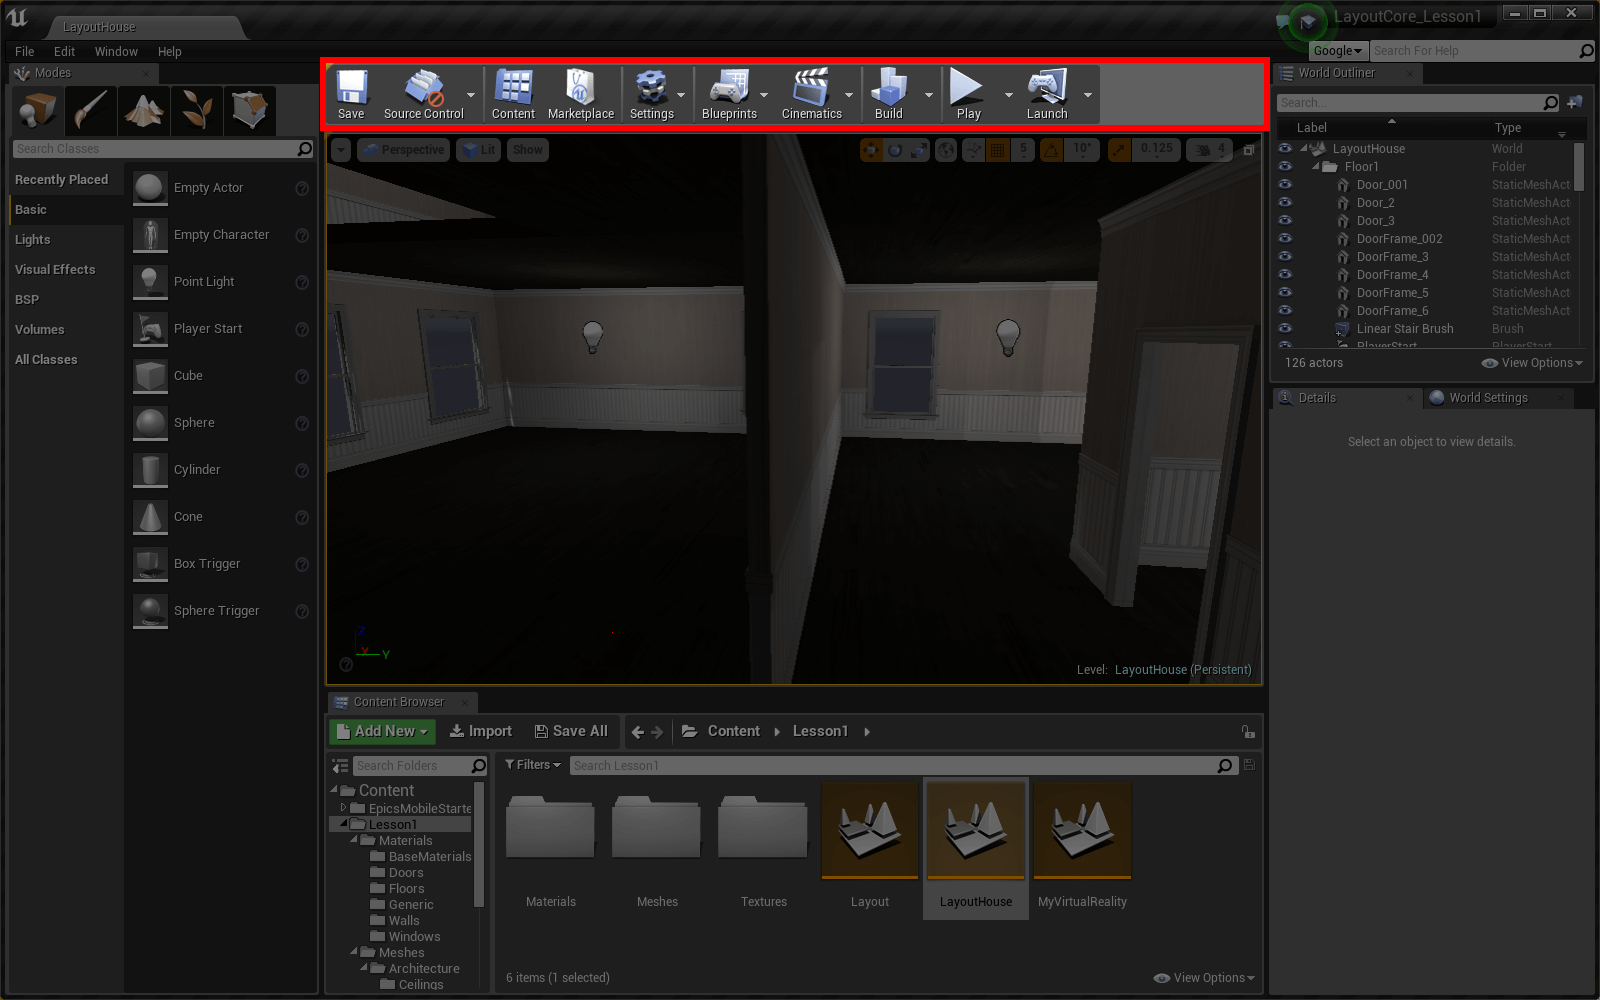
- Click the Play button to run your game in the editor.
- Click the small triangle next to the Play button to open a dropdown menu. Click VR Preview to run the game in your Head Mounted Display (HMD).
If the VR Preview button is grayed out, it means your HMD is not set up properly. First make sure you followed all the Setup Steps. Then:
- Close UE4
- Unplug your HMD
- Plug in your HMD and make sure your computer recognizes it
- Open UE4
Placing Actors
It’s time to put some actors in our level!
Remember, Actors are objects that can be placed in the world.
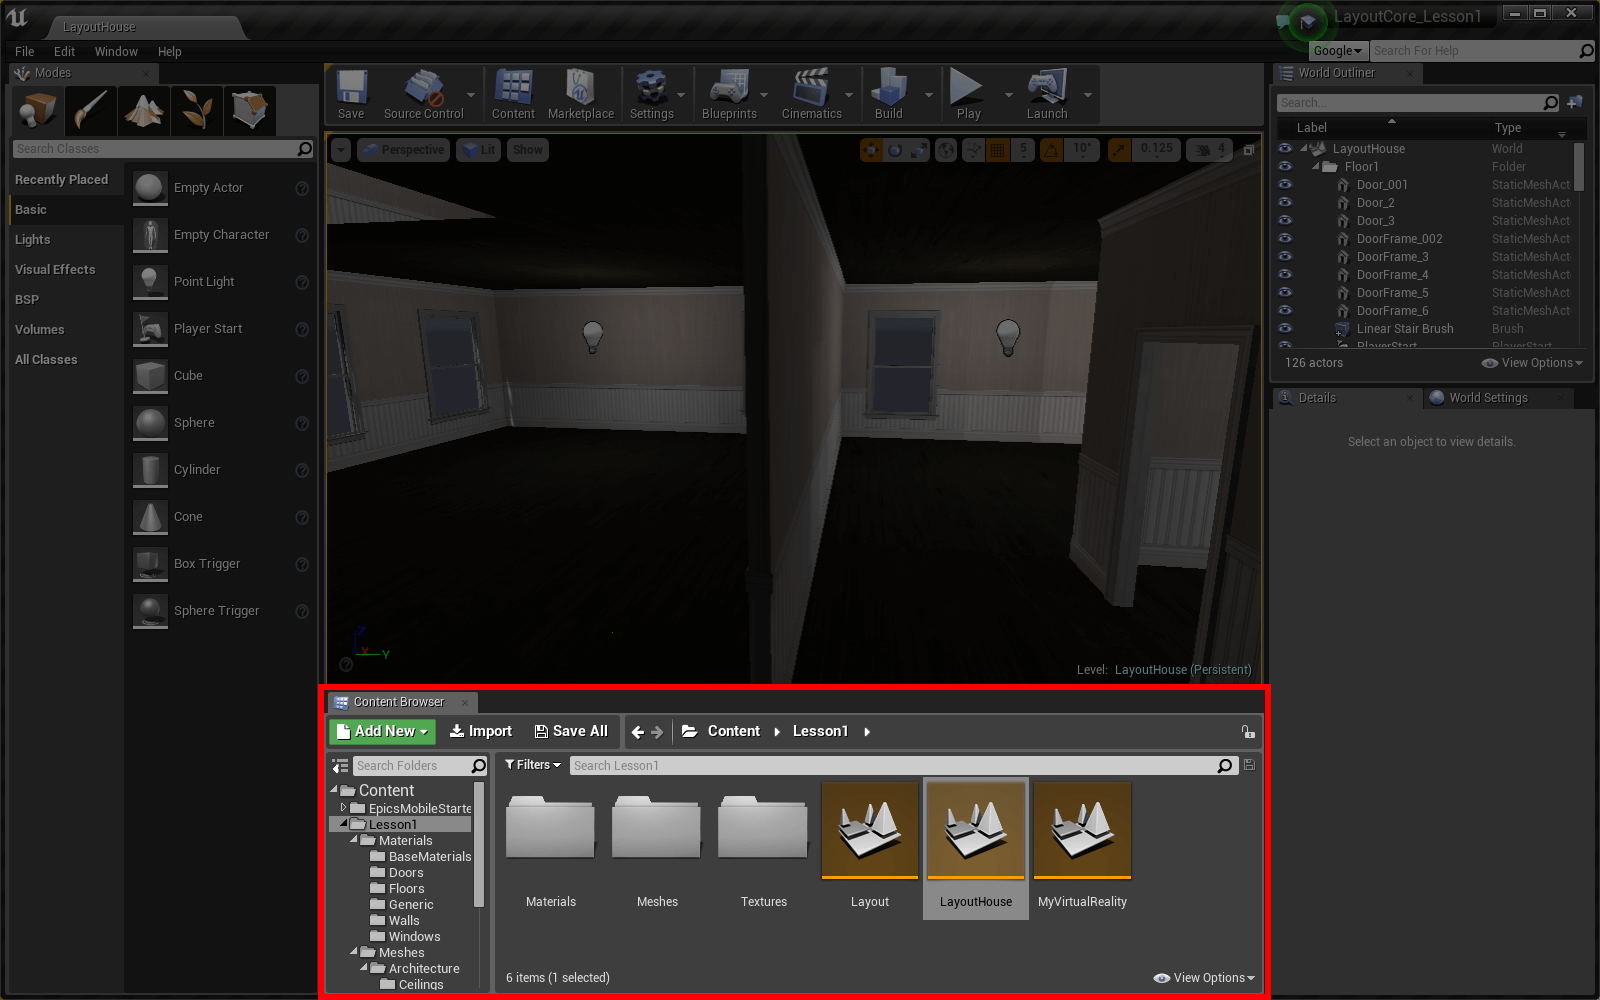
Beneath the Viewport is the Content Browser, which provides access to the project’s assets and files.
Let’s create our own room. In order to do that, let’s start in an empty level:
- Open the Lesson1 folder
- Double click the MyRoom level to open it
Great. Now we have some space to work with. Time to place some actors!
- Open up the Meshes folder
The Meshes folder contains a bunch of Static Meshes separated into folders. This project has a huge set of starter assets for you to play with later, but for our room, we’re going to stick to the InteriorArchViz assets.
Static Meshes are 3D Models that we can use in our world.
- Open the InteriorArchViz > Architecture > Spacers folder
- Click and drag the Spacer_500x500 static mesh into the viewport.
You just placed your first actor!
Moving Actors
Now that we have a floor in our level, let’s position it at the origin of the world.
The Details panel in the lower right shows all the details of a selected actor.
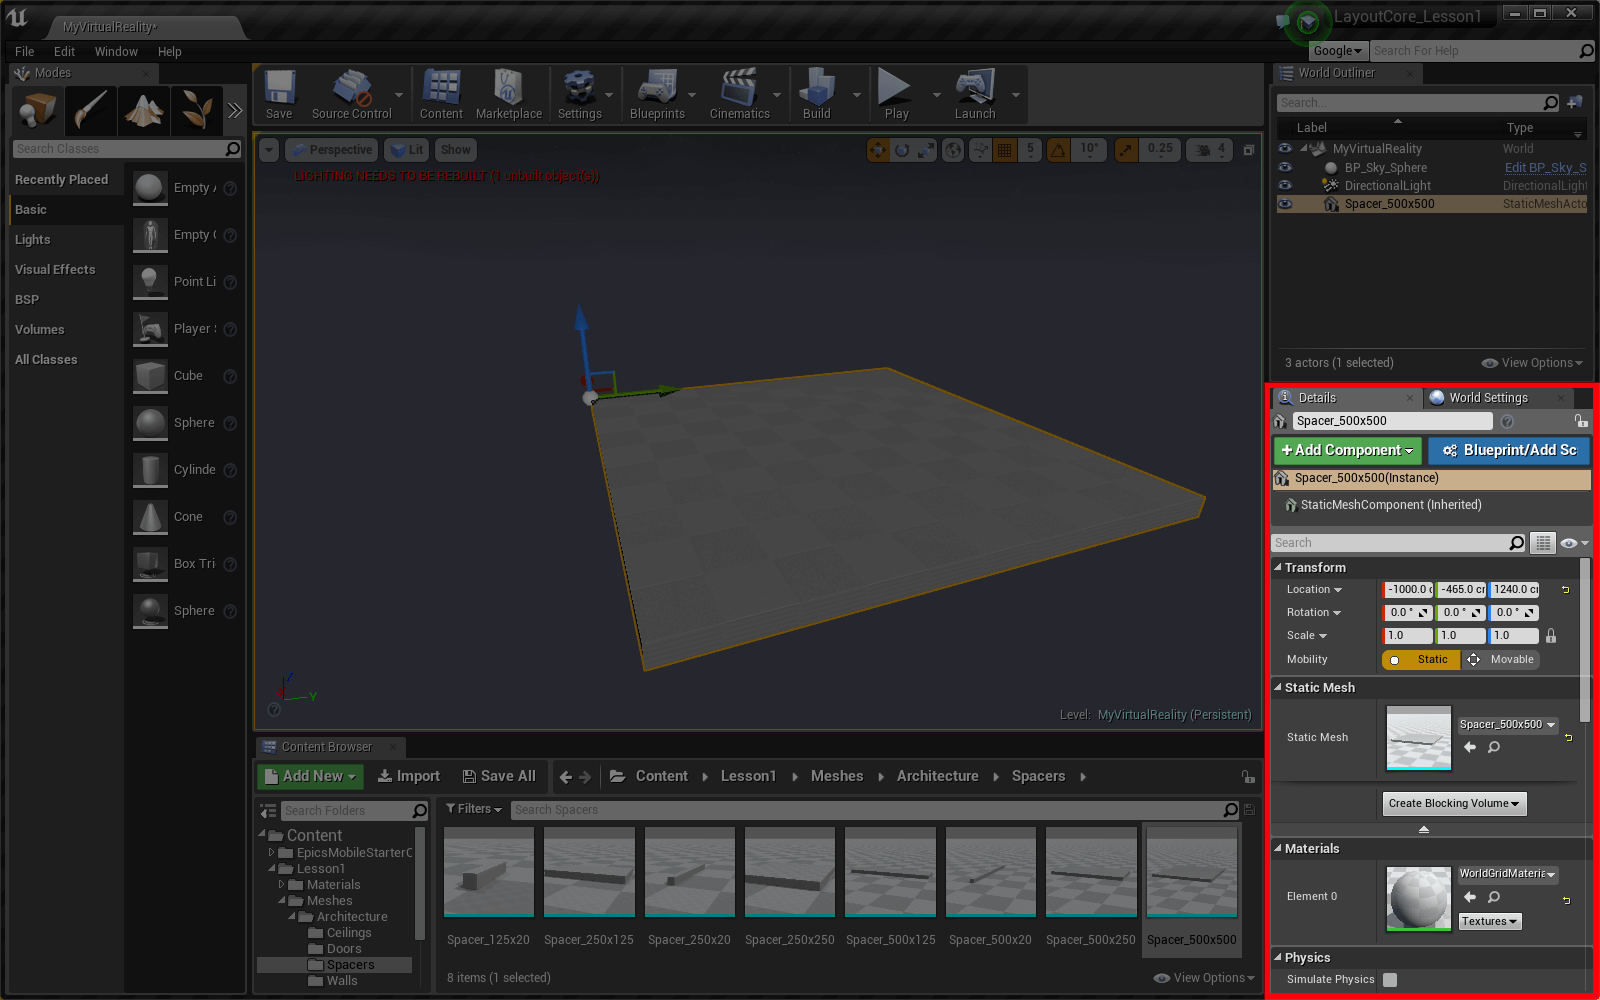
Right now, we care about the Transform - Location, Rotation, and Scale - of the floor actor.
- Set the Location of the floor to [0, 0, 0]
The Transform of an actor can also be edited using the 3D handles in the viewport:
As you can see, you can change the mode of the 3D handles in the upper right corner of the Viewport. The Location, Rotation, and Scale handle modes can also be selected with the W,E, and R keys respectively.
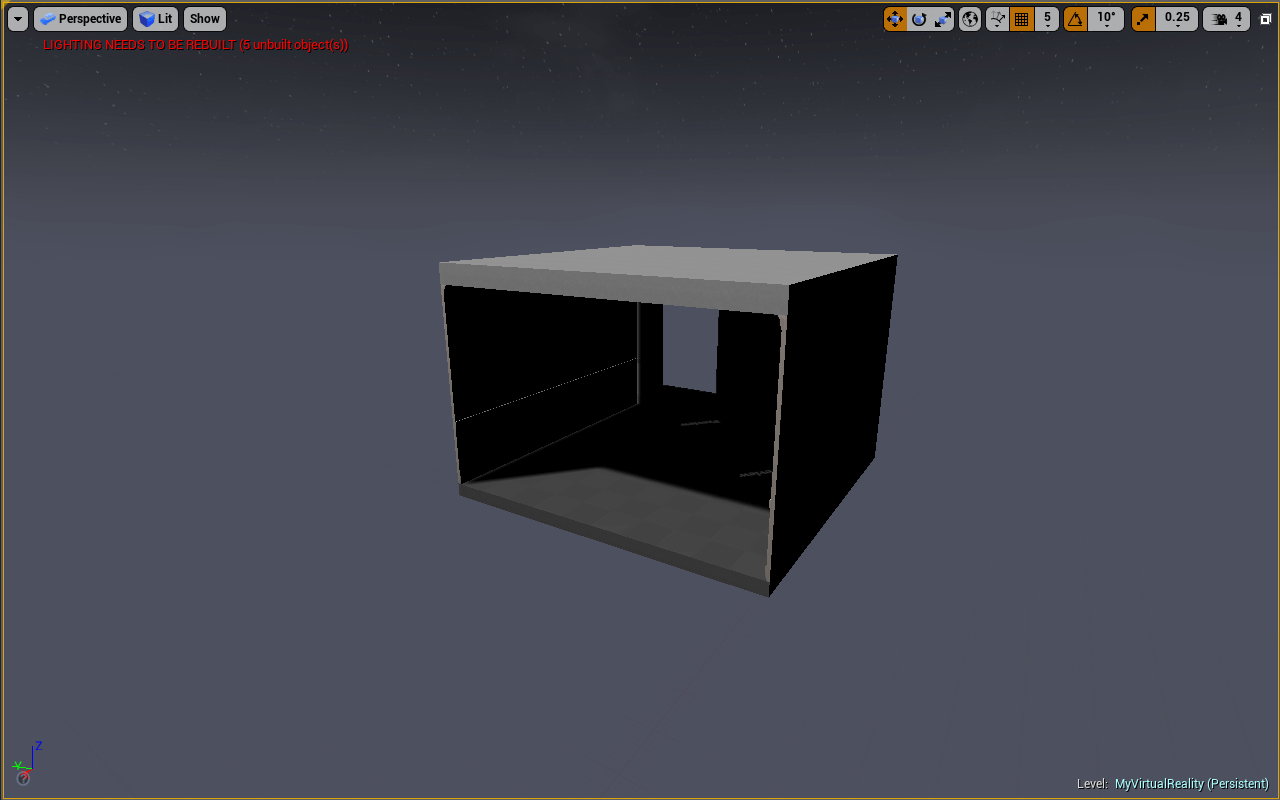
Challenge:
Place 3 walls and a ceiling in order to create an open room. Find the appropriate static meshes in the Walls and Ceilings folders.
Use this as an opportunity to get familiar with using the 3D handles and the Details panel for transforming actors.
Tips:
- Pay attention to the titles of the static meshes to know what type and size they are.
- Hold Alt and move a static mesh to move a copy of the mesh.
- Right-click a static mesh actor and hover the Transform sub-menu to get more transforming options.
- To delete an actor, select it and press the Delete key
Using some tips:
Here’s an example finished room:
- Now that you’ve made some changes to your level, press Ctrl+S to save all your changes!
Placing Lights
Let’s add a light inside your room:
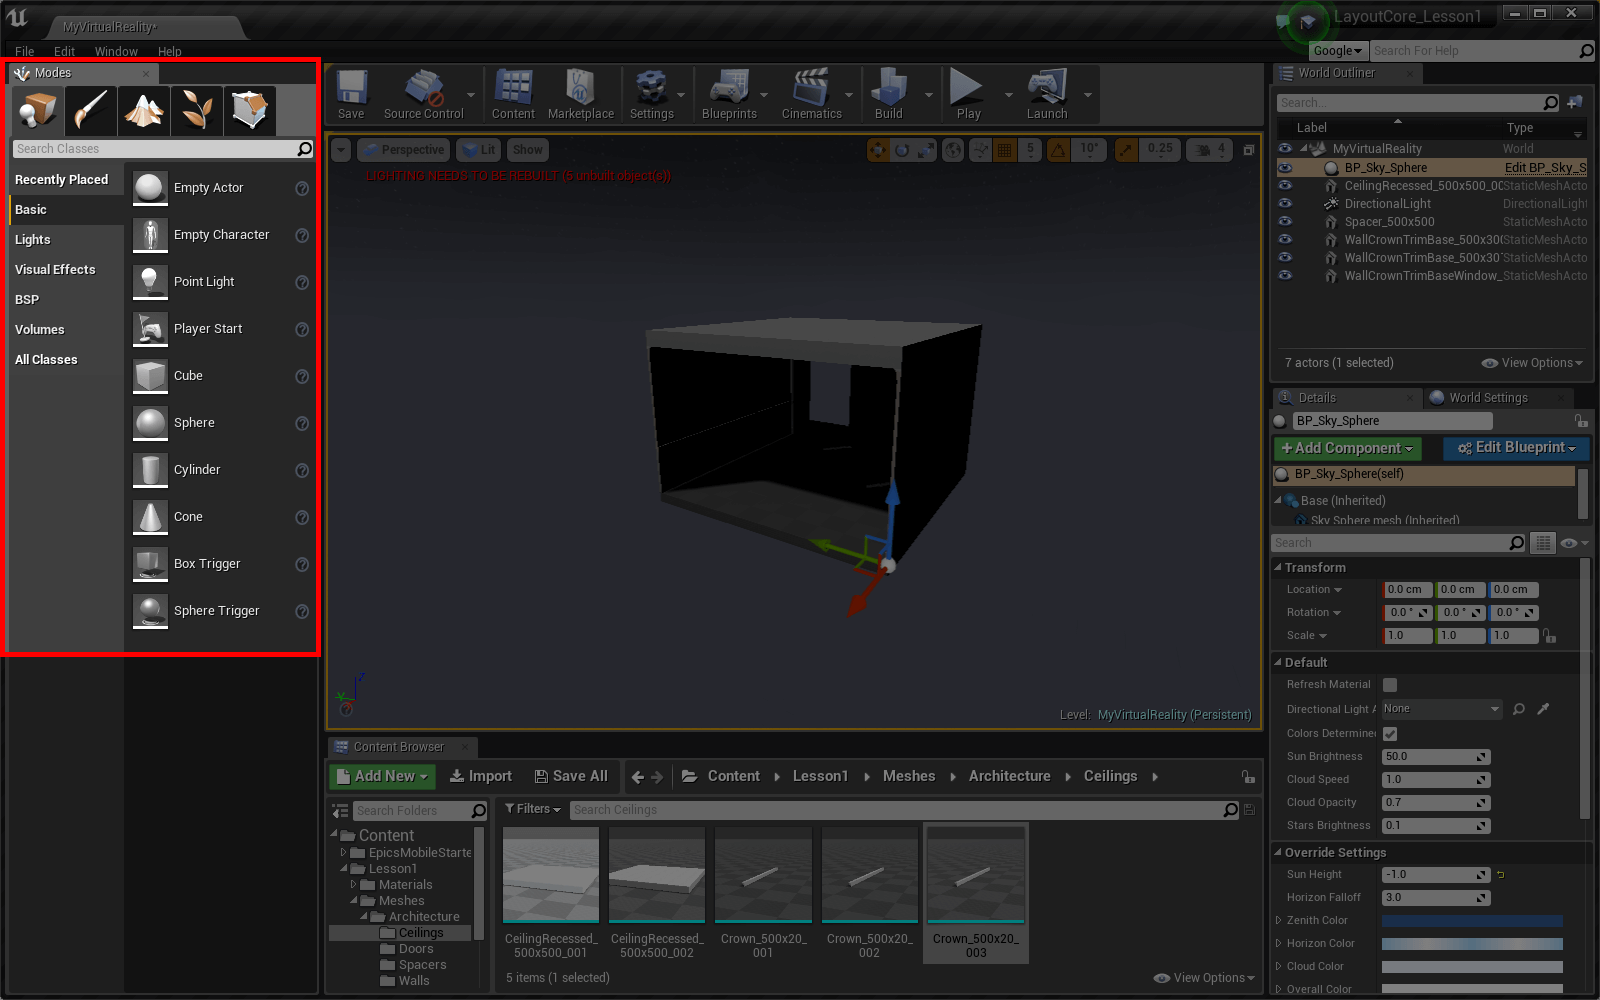
The Modes panel in the upper left allows access to different UE4 tools like texture painting, landscape creation, foliage placing, and geometry editing. The default Place mode, the mode we currently care about, allows you to place common actors - like lights - into your level.
To add a light:
- In Place mode, open the Lights submenu
- Click and drag a Point Light into the center of your room
Unreal Engine 4 features four different types of light: Point, Directional, Spot, and Sky.
Point Lights work much like a real world light bulb, emitting light equally in all directions from a single point in space.
Directional Lights simulate light emitted from a source that is infinitely far away. All shadows cast by this light will be parallel, making this the ideal choice for simulating sunlight.
Spot Lights emit light from a single point in a cone shape.
Sky Lights capture ambient light information from the far distances of the map.
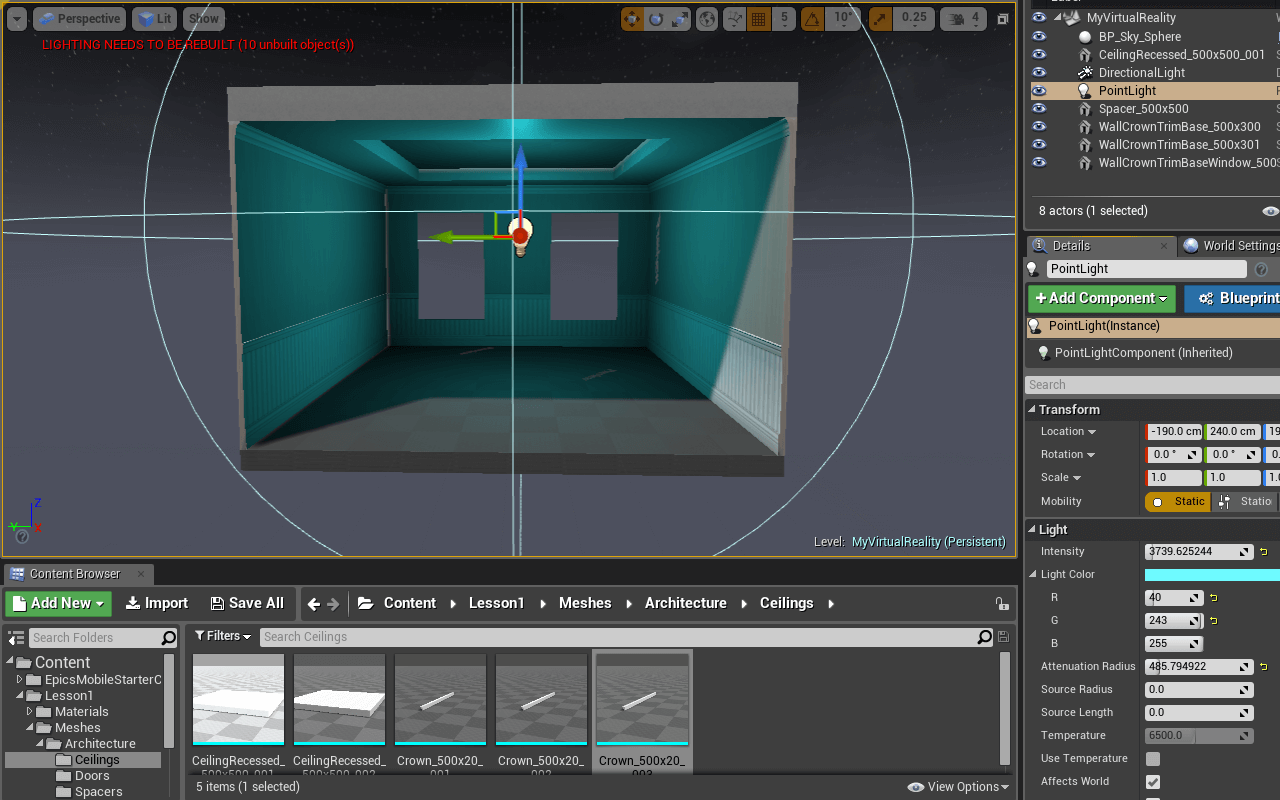
Challenge:
Click on your new Point Light and edit some of its properties in the Details panel. The most fun properties to edit are:
- Light Color
- Intensity
- Attenuation Radius
Lighting for VR is tricky because it’s an expensive process, and VR requires optimal performance. For that reason, we should try to use static lighting wherever possible.
Static lighting is less expensive than Dynamic lighting because all the calculations are “baked” into the textures before the game even runs. In this way, our VR experience will not have to calculate any lighting for lights that are set to static. The draw back is that you can’t change a static light’s color or intensity mid-game. Static lights also don’t cast dynamic shadows.
To make your light static:
- Set Mobility to Static in the Details panel while the light is selected.
Once your light is in the correct place:
- Click Build in the Toolbar above the Viewport
The engine will then calculate all the lighting and bake it into the scene.
Your lighting is now baked into the world! To demonstrate what this does, go ahead and move your light, or delete it all together. As you can see, the baked lighting still remains. The moment you press Build again, all old lighting data will be lost and the new placement of your light will be baked into the scene.
To summarize:
- Use Static lighting if you only need the light to illuminate the scene. This is best in terms of performance.
- Use Stationary lighting when you want the light to change color, change intensity, or cast dynamic shadows.
- Use Movable lighting when you want the light to be able to move and also change color, intensity, or cast dynamic shadows. This is the most expensive type of lighting in terms of performance.
If you ever forget, hover any of the light’s Mobility options in the details panel for a helpful tooltip.
Changing Materials
There are a couple pieces of our room that look like a checkerboard; most notably, our floor! Let’s change the way our floor looks by changing its material.
- Click on the floor
- In the details panel, change its Material - Element 0 to MI_Oak_MedBrown
Great! There are all kinds of materials to choose from. You can find them in the Materials folder.
Many of our materials were made specifically for certain assets. For this reason, a door material won’t look good when placed on a floor mesh.
Use the folder structure to guarantee you’re using a proper material. You can also just use your eyeballs!
- If you want to use a material you find in the Content Browser, you can just drag and drop it onto the static mesh you want to update.
Challenge:
You’ll notice that the center of your ceiling also looks like a checkerboard. Change it’s material!
Note that the material you want to change is Element 1 on the ceiling static mesh actor.
Editing Material Instances
Material Instances allow you to easily edit Layout’s pre-made materials. Let’s make our wood floor pink!
- Navigate to Materials > InteriorArchVis > Floors > Wood
- Right-click any material and select Create Material Instance
- Name your new Material Instance MI_WoodFloors_Pink
- Open your new Material Instance by double clicking on it
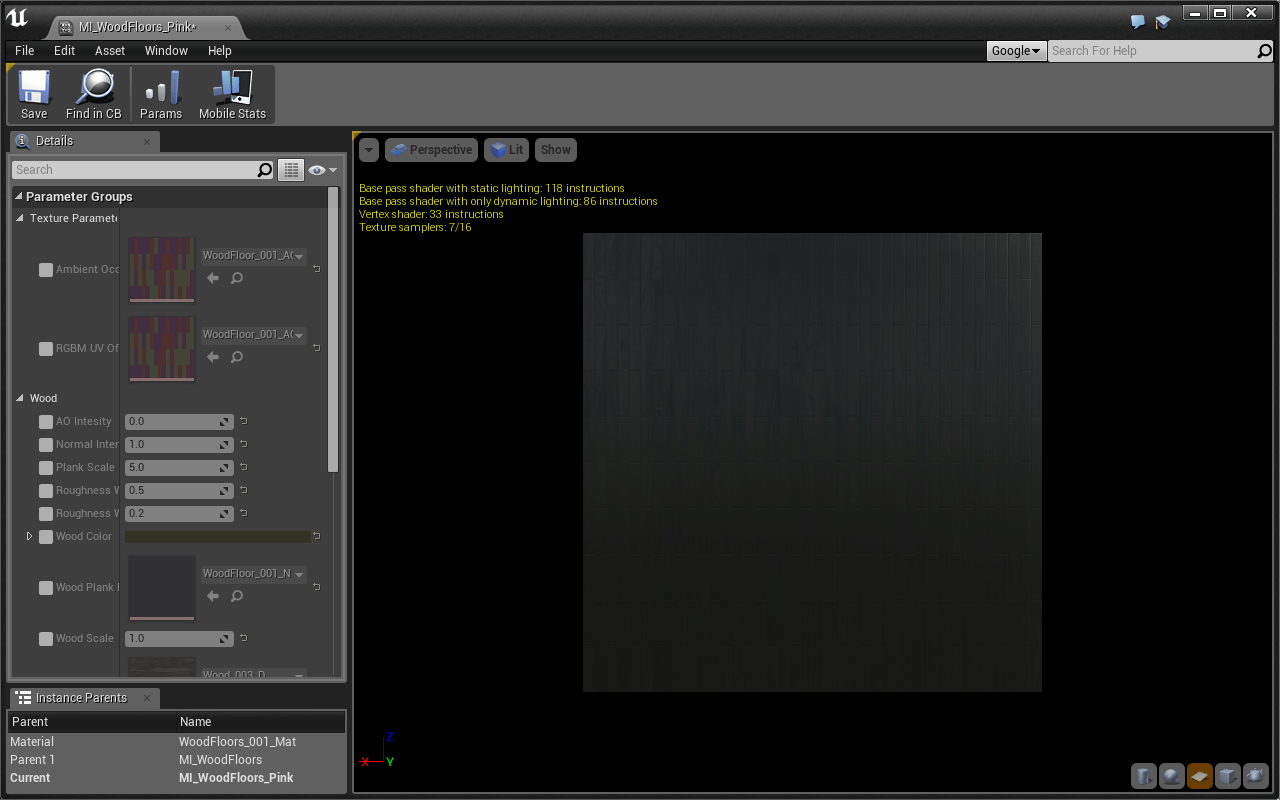
There are a lot of things you can edit here. We’re looking for the Wood Color parameter in the Details panel.
- Check the box next to Wood Color. Now we’re able to edit that value.
- Click on the color bar to open a color picker
- Change it’s color as you wish (update the name if you choose against pink)
- Update the floor with your new material.
Make Material Instances as you wish! All of Layout’s provided materials are set up for simple and advanced customization.
Player Start
Currently, whenever you press Play the experience starts from wherever the camera is in the world. This is fine when testing things out, but won’t work for a finished product. Instead, you’ll want to designate a place that the player spawns. This can be done with a Player Start actor!
- In the Modes panel, find Player Start in the Basic category
- Drag and drop it into your world
- Set its Location and Rotation to something that makes sense
That’s it! Now whenever you press Play you will start from the designated spawn point.
It’s possible that you want to place a Player Start, but still spawn at the current camera location during development. To do this:
- Open the dropdown next to the Play button
- Find the Spawn player at… section
- Select Current Camera Location
Viewport Properties
This section will briefly go over some of the Viewport tools available to you. These tools will make it easier to transform actors to perfection.
Viewport Views
You can quickly change your view to get orthographic perspectives of your level using the button in the upper left:
Orthographic perspectives are great for perfectly placing actors in your level.
To get all 4 views at once, click the button in the upper right:
Snap Values
Adjusting your Snap Values is a great way to speed up your level creation process.
Changing Position Grid Snap Value allows you to move your actors in multiples of 1, 5, 10, 100, and more. This value is super helpful when constructing modular pieces like your house, and affects the initial placement of an actor as well.
Snap values exists for Rotation and Scale as well.
The UE4 Level Editor Documentation is full of additional information if there are parts of the Viewport or Level Editor you want to know more about.
To learn more advanced techniques for transforming actors, check out this UE4 Documentation.
Conclusion
Well done! You’re well on your way to becoming a UE4 master. Here’s what you already know how to do:
- Navigate through a game world in the Viewport
- Place an actor in the world using the Content Browser or Place Mode
- Change an actor’s position, scale, and rotation as well as edit other attributes in the Details panel
- Use lights to better illuminate your world
- Change a Static Mesh’s material
- Create your own Material Instances
- Understand some UE4 terminology like Actor, Static Mesh, Transform, and Material
Project 1 - Your VR
Your VR
Your first assignment is to create 4 levels using any of the assets provided in the starter project. In each level, we want you to incorporate design strategies that take advantage of opportunities unique to virtual reality: scale, rotation, and translation. Place however many assets you need to demonstrate your mastery of each vr opportunity.
- Scale (HW_Scale)
- The relative size of objects in a VR scene can have a powerful effect on the viewer. When immersed in a stereoscopic environment, the viewer is able to infer more about scale because the environment is rendered for each eye at slightly different positions. Neato!
- This level should use scale in a meaningful way. Will the viewer feel small, large, or both? Does scale create an interesting relationship between assets in the environment?
- Rotational Degrees of Freedom (HW_Rotation)
- The headset tracks three rotational degrees of freedom: pitch, yaw, and roll. With this information, the headset can provide a more immersive environment as the viewer rotates. Wow!
- This level should inspire the viewer to rotate.
- Translational Degrees of Freedom (HW_Translation)
- The headset also tracks three translational degrees of freedom: up/down, left/right, and forward/backward. With this information, the headset can provide a more immersive environment as the viewer moves in position. Oh my!
- This level should inspire the viewer to move their head. Does movement reveal something interesting about the environment? Does parallax enhance the viewer’s experience of depth?
- Your fourth and final level is entirely up to you. Get creative! (HW_MyVR)
- Give your final level a title. Put that title somewhere in the environment using a Text Render. We want you to get familiar with the Unreal Engine documentation and your TAs, so we won’t tell you how to use Text Render here.
Getting Started
Your starter project comes with 4 starter maps that correspond to the 4 scenes you need to make. Find them in the Lesson1 > Homework folder. They’re named HW_Scale, HW_Rotation, HW_Translation, and HW_MyVR respectively.
Each starter level contains a few basic actors to set up the world with lighting and other important level components. We’ll cover these actors in the coming weeks. Your scenes might not make sense in the massive unending horizonscape. Consider alternative settings for each level.
The viewer won’t be able to move away from the Player Start position in these levels. Movement in virtual reality is a difficult design challenge that often requires novel approaches to navigation. We’ll have a chance to explore movement in the coming weeks, but we want you to focus on seated, static environments in this assignment.
Don’t miss the opportunity to familiarize yourself with all the assets we’ve created. This starter project has most of what you’ll be using throughout this course. Feel free to incorporate whatever you like.
Good luck and have fun!